Let's take a deeper dive into LEGO pneumatics. We'll explore the history of the system, the components, the science behind it, LEGO sets and MOCs. Let's get started, there's a lot to explore.
It's all Greek to me
The word 'pneumatic' is derived from the Latin 'pneumaticus', which in turn comes from the Greek 'pneumatikós', meaning 'air, breath or spirit'. According to the dictionary, it means 'containing or working with air or gas under pressure'. Pneumatic energy is clean, fast and easy to obtain via a compressor. Pneumatic breakers, impact wrenches, springs and brakes are examples of this. Many of the tools your dentist has, that you may not be aware of, also operate on air pressure.
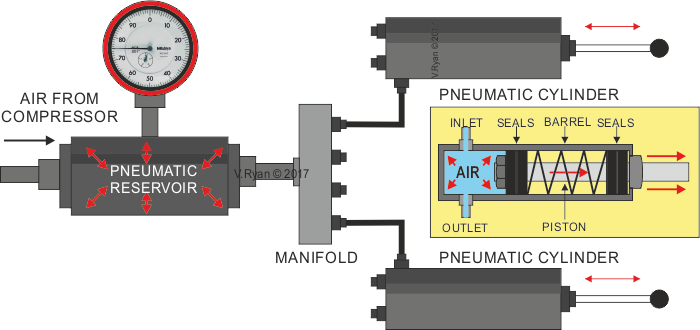
Basic Pneumatics via Technology Student .
Pneumatics has a cousin in the form of hydraulics. This word, with Greek/Latin roots, comes from 'hudor', meaning water. It refers to a technology that uses fluids, often oil, to transmit power. Hydraulics offer some advantages over pneumatics because fluids are not compressible like gases. This results in greater precision and power. This is why hydraulics are used in heavy machinery such as excavators, loaders, cranes and tow trucks. However, hydraulics can be messy and are generally more expensive.
Because they are so similar, pneumatics can be used to model hydraulics, which is exactly what LEGO decided to do this when they wanted to make more realistic heavy machinery. For With LEGO models, power and precision are not as important, but cost and ease of use are.
Now that we have that theory out of the way, let's go back in time to the beginning of LEGO Technic.
In the beginning…
Technic was introduced in 1977 with four sets (well, four models anyway - there was also an engine set and an add-on set). Two more sets were released in 1978 before a rapid expansion of the Technic parts palette began. In 1979, chains and treads were introduced, in 1980 shock absorbers, a differential and the 16-tooth sprocket were added, in 1981 medium tires, knee joints and steering arms. After that, things slowed down a bit; in 1982 only friction pins were added, and in 1983 the 3L axle.
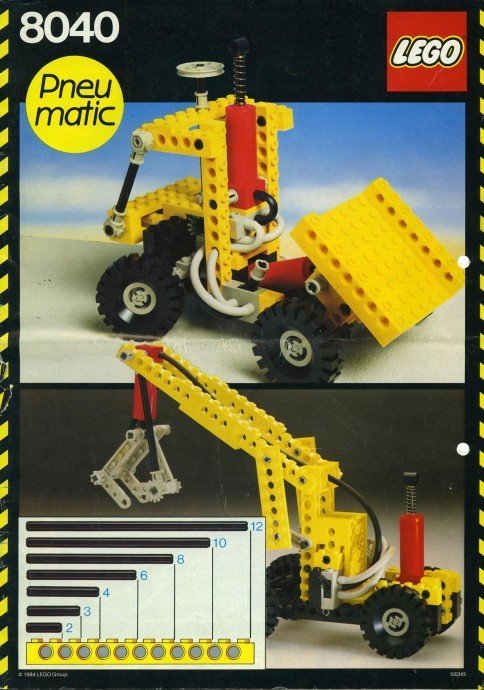
In 1984 came the biggest innovation yet and the subject of this article: pneumatic elements. The first wave introduced all the core parts of the system: a pump to create pressure, a valve block and switch to control the pressure, and working cylinders to use the pressure.
LEGO Pneumatic System version 1
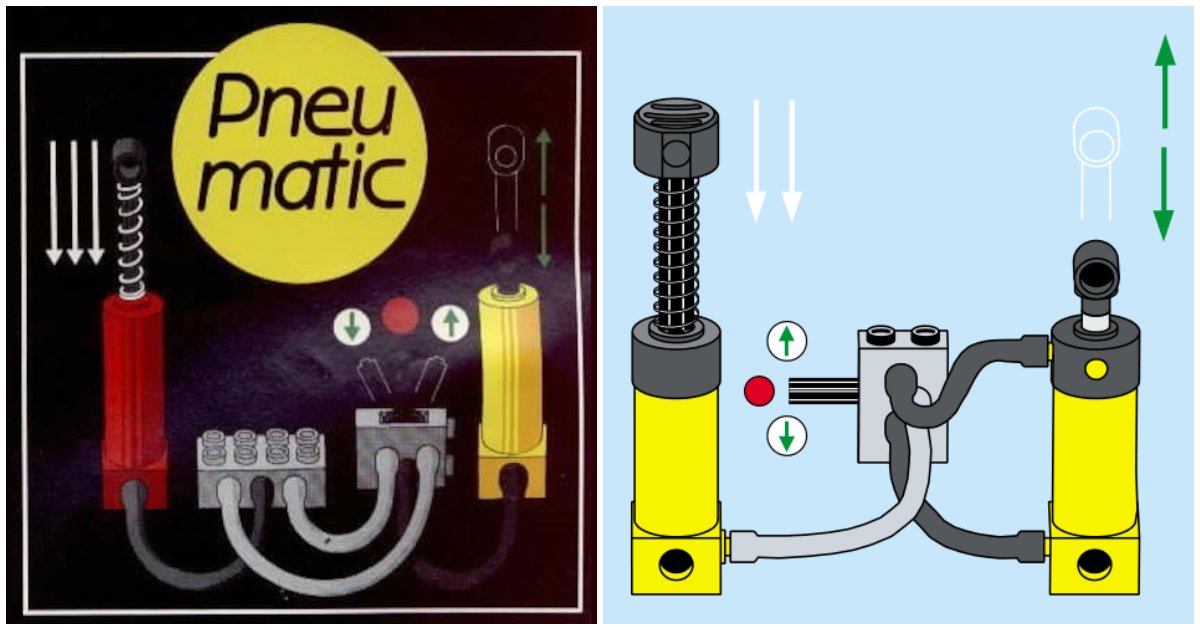
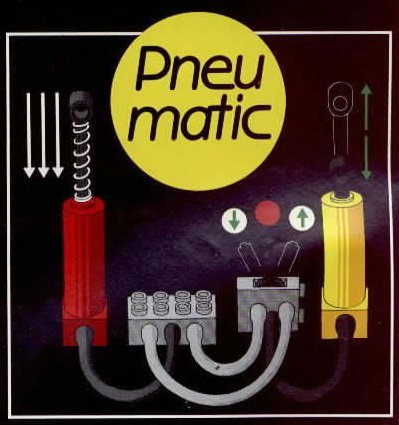
It was a clever system, with a special distribution block at the heart. It has two one-way valves, so with the pump connected in the middle, it blows air out of one side and sucks air out of the other. If you connect each side of the valve block to one side of a switch, you can choose whether the middle port on the switch blows or sucks air. Connect this port to a cylinder and you can now control the cylinder with the switch. This is all shown in the diagram below; you push the red pump, move the switch left or right and the rod in the cylinder goes up or down.
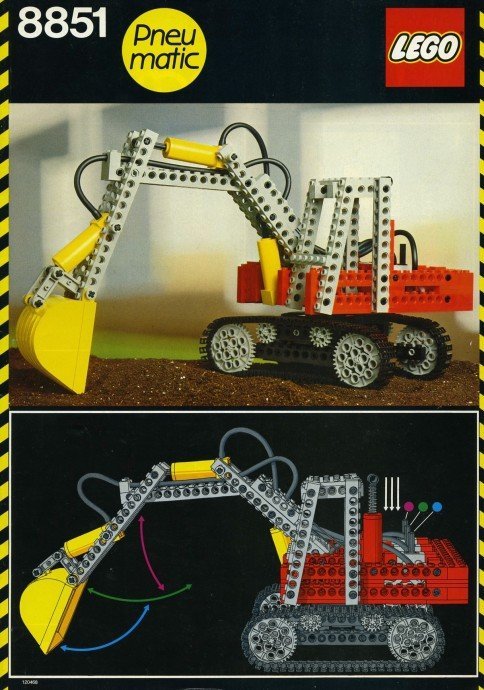
The flagship set of that year, 8851 Excavator, was a very impressive machine with a much more realistic mechanism than the 856 Bulldozer released a few years earlier, but it had to make do with rack and pinion. One more pneumatic set (8680 Arctic Base) was released in 1986 before LEGO realized that improvements were needed.


Here comes the science part: concentrate!
See, there was a pretty fundamental problem with this early system, and to explain it I have to put on my physics teacher hat. What LEGO had developed was a system with single-acting pneumatic cylinders. That means that the compressed air from the pump only works on one side of the working cylinders. Here’s what that looks like:
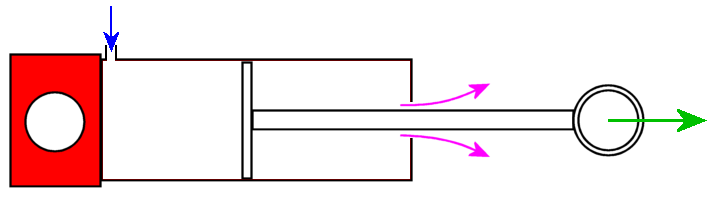
Single acting pneumatic cylinder pushes
Blue is the air from the pump. When it is pushed through the port at the base of the cylinder into the left chamber, it pushes the piston to the right and this forces the air from the right chamber out of the cylinder along the rod.
The harder you pump, the higher the pressure of the air in the left chamber, the harder the piston (and the rod with the pin hole) are pushed out. So far so good.
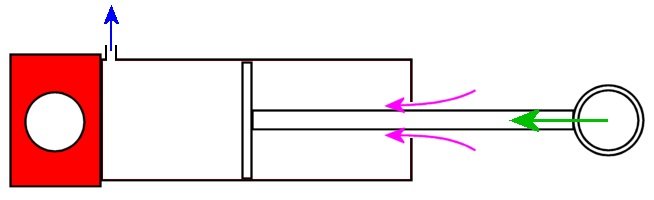
Single-acting pneumatic cylinder pull
And what if we want to do it the other way around? Thanks to the distribution block with its one-way valves, the pump now sucks the air from the left chamber. Air from outside enters the right chamber and pushes the piston inwards.
The problem is that no matter how hard you pump, the air that the piston pushes in will never be at more than atmospheric pressure, the pressure of the air in the chamber. That means the cylinder can never pull at more than that atmospheric pressure.
The solution was to switch to double acting cylinders. What does that mean?
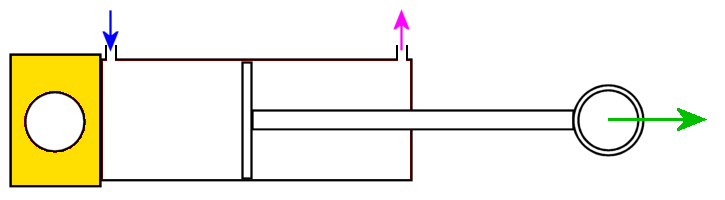
Double acting pneumatic cylinder
There is not much change in the push action. The air from the pump still enters the left chamber and the air from the right chamber is pushed out. The only difference is that the air is now pushed through a second port on the cylinder instead of along the rod.
The big difference is in the pull action.
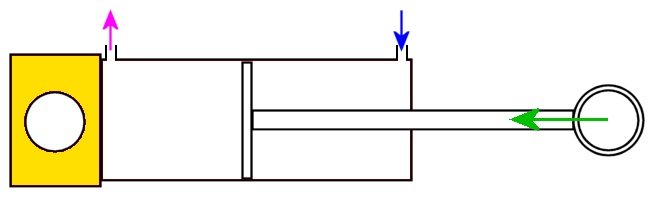
Double acting pneumatic cylinder pull
Instead of sucking air out of the left ventricle, the pump now pushes air into the right ventricle, forcing air out of the left ventricle through the port. The harder you pump, the higher the pressure in the right ventricle and the greater the pulling force of the cylinder.
Okay, I'm going to take my science teacher's hat off and go back and look at the components of pneumatics V2.
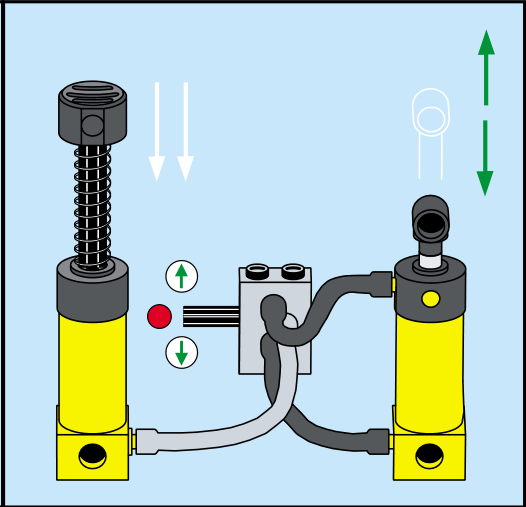
LEGO Pneumatic System Version 2
The pump was new, and not just in appearance. The first pump could generate a vacuum, but the new pump had a one-way valve and could only push air out through the port. The distribution block was no longer needed because there was no need to suck air out of the cylinders. The switch remained the same, but as mentioned above, the cylinders changed. They got a second port and were upgraded from plastic rods to metal.
As you can see in the diagram, the new system was much simpler.
Putting the new system into practice
Pneumatics V2 was introduced in 1989 with three sets; a universal set, a crane and a backhoe loader - both models that would return to the pneumatic range. Three years later two new parts were introduced, a small cylinder and a small pump. The small pump does not have a spring like the larger ones. It is intended to be powered by a motor, and that is exactly what happened in Technic's flagship set of that year. 8868 Air Tech Claw Rig is a legendary set, the first pneumatic set with a built-in compressor. Technicopedia has an excellent article about it that is worth a read.
The next innovation was the air tank. A blue cylinder with an in and out connection, this simply acted as a buffer to store compressed air. It worked really well and made for a much smoother operation. It was used in two sets in 1997 and then another in 1998. Oddly enough it has only appeared in two reissues of one of the '97 sets since then and in white in a Dacta set. Due to these low production volumes this is now an expensive item; expect to pay €20/$20 for a used one. That same Dacta set included another now expensive item: a Manometer which only appeared in that one short lived set.

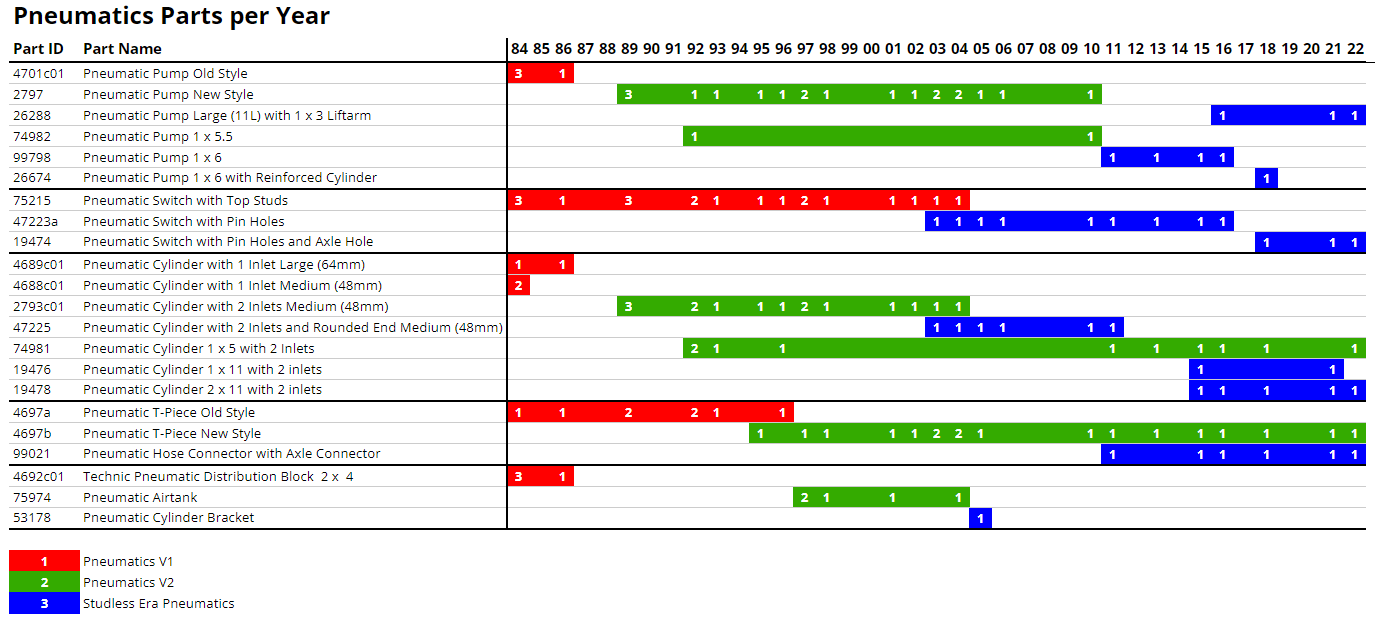
In the meantime, Technic had started to move to a studless design language, so the studs were slowly removed from the pneumatic parts. The small pump and cylinder were always studless, but in 2003 the switch and medium cylinder were replaced with studless versions, and in 2016 we finally got a studless large pump. In 2011 the small pump was made slightly longer to better fit the studless system, and in 2015 two longer cylinders were introduced. The table below shows the production lifespan of various pneumatic parts. The numbers are the number of sets per year the part was released.
Most pneumatic parts are very specific and can't really be used for anything else. However, there are two parts that were developed specifically for the pneumatic system, but have been used in hundreds of other kits.
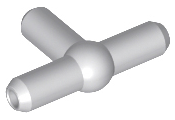
The first is the humble T-piece. It was developed as a splitter to connect two cylinders to one switch, but the ability to attach anything to it has made it a versatile part that has been used in all sorts of kits and MOCs. One of the first kits outside of Technic to use it was the mighty 5571 Black Cat Truck. In 2011 its cousin, the Hose Connector with Axle Connector, was born and it too has proven to be versatile and popular.
But wait, there's more than LEGO Technic
So far we’ve looked at Technic, but there are actually two other LEGO pneumatic systems. In 2001 we had a short-lived theme called “Life on Mars.” The flagship set, 7317 Aero Tube Hanger, had a pneumatic system with tubes that could transport Martians in small barrels. It was a bit like the internal mail systems you have in banks or department stores that suck containers through tubes.
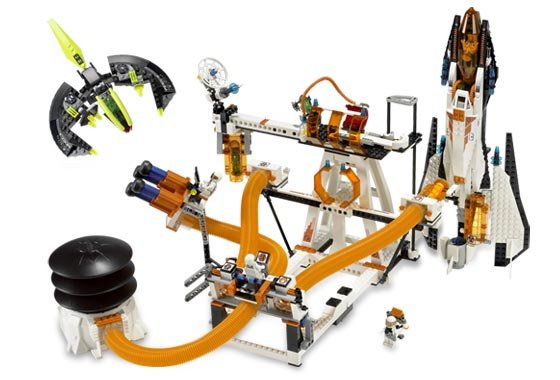
7690 MB-01 Eagle Command Base
That set, and specifically the pipe system, also gave us the 2x8 door slide plate. The system made a comeback in 2007 with Mars Mission, where it was also used to shoot nerf-style darts. Jang Bricks has a great video demonstrating all of this.
More recently (and slightly less exciting) is the fake water that was used in two City sets in 2019 and hasn’t been seen since. There’s a rubber bladder that you squeeze and when you do, a jet of water/translucent blue tube comes out of the barrel. The extendable tube can be used to knock down flames.

60214 Burger Bar Fire Rescue
One of those two sets shows that the bladder, with the help of an adapter piece, is physically compatible with the Technic pneumatic system. A regular pneumatic hose is used to connect the bladder at the base of the ladder to the water tube section at the other end. This compatibility has not yet been used. Given how different the characteristics of the bladder and the pneumatic pump are, I doubt it will ever happen, but you never know. LEGO set designers are creative people…
Pneumatic Hall of Fame - Sets
There are a few pneumatic sets I would like to highlight. Some have been briefly mentioned before, but deserve a bit more attention.
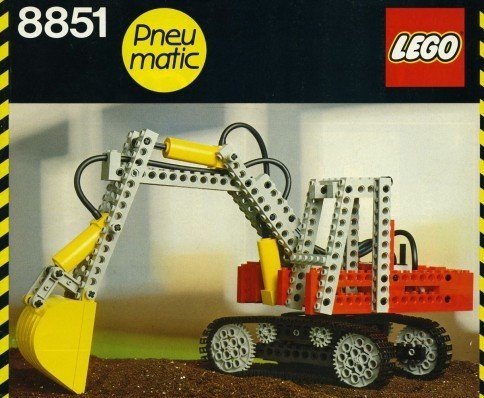
8851 Excavator, the first pneumatic flagship set (1984)
Compared to today's kits this may look a bit crude and simple, but you have to put it into perspective. The proportions are quite good and the articulation of the boom is perfect. In its day it was a fantastic kit. This kit also introduced the threaded Technic axle.

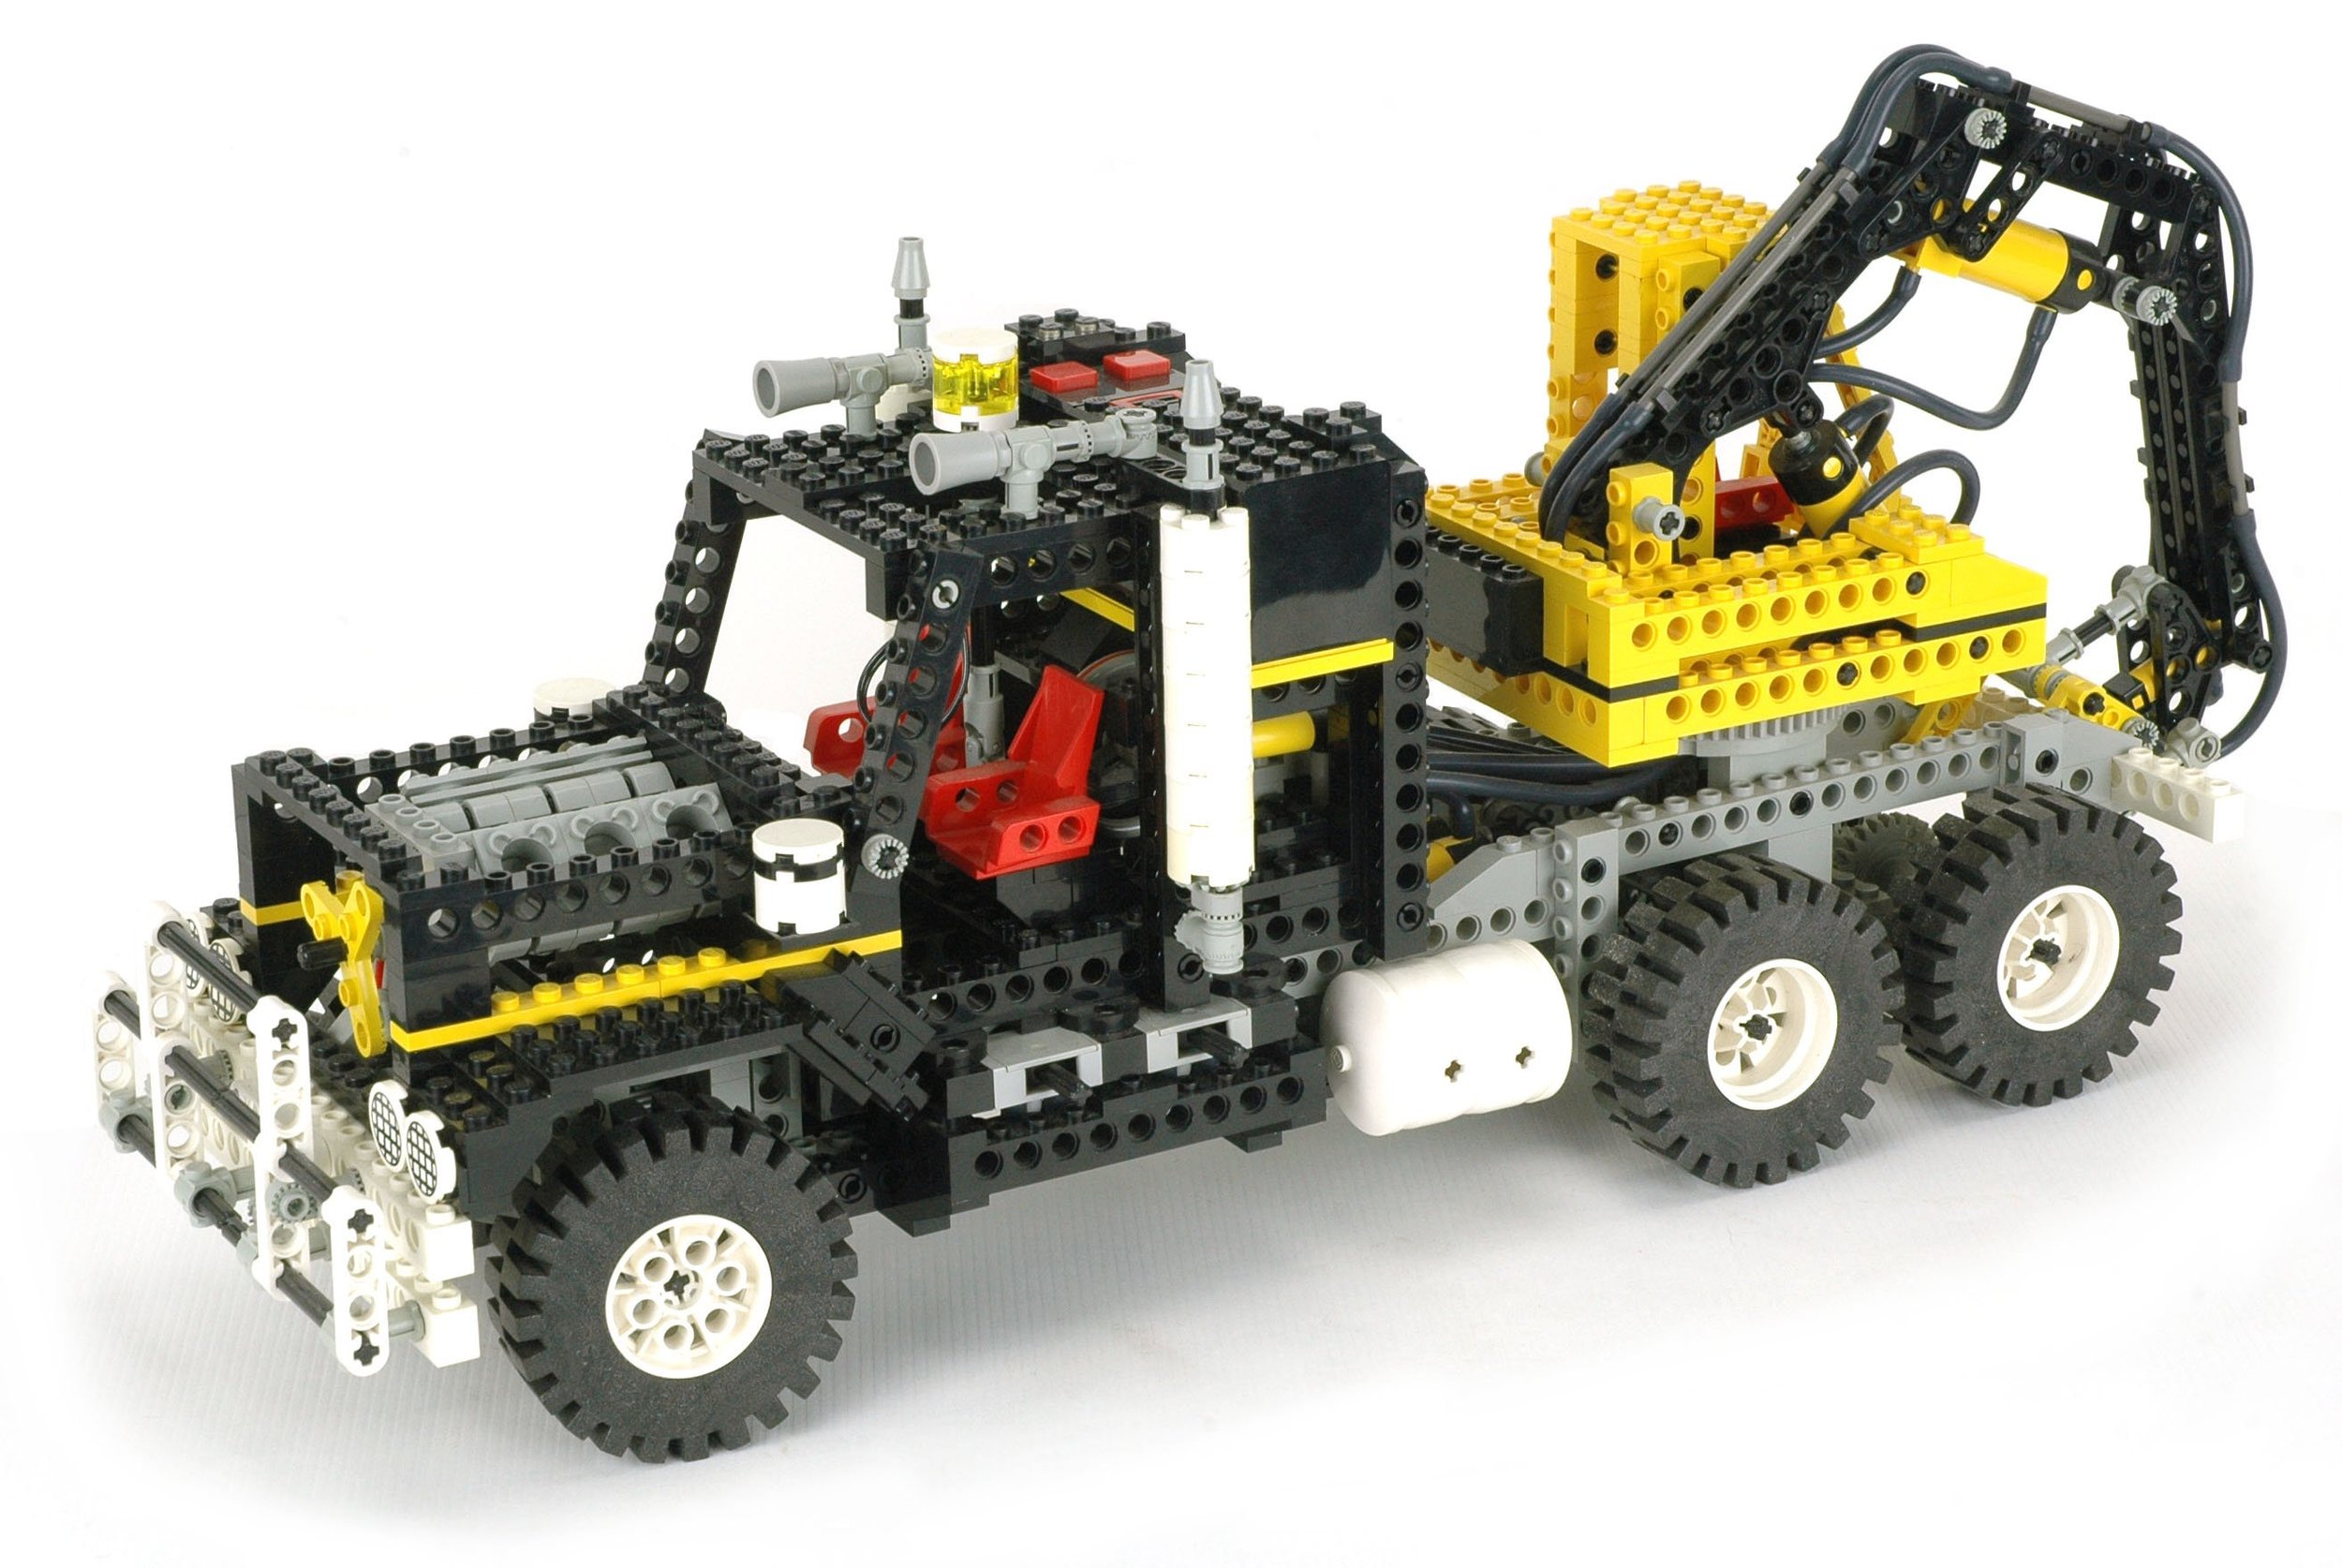
8868 Airtech Claw Rig, the first onboard compressor (1992)
A tough truck, with a V6 engine, an engine inside that drives a compressor and a fully pneumatically controlled crane at the back. This set raised the bar for flagship sets and remained a fan favorite for a long time.
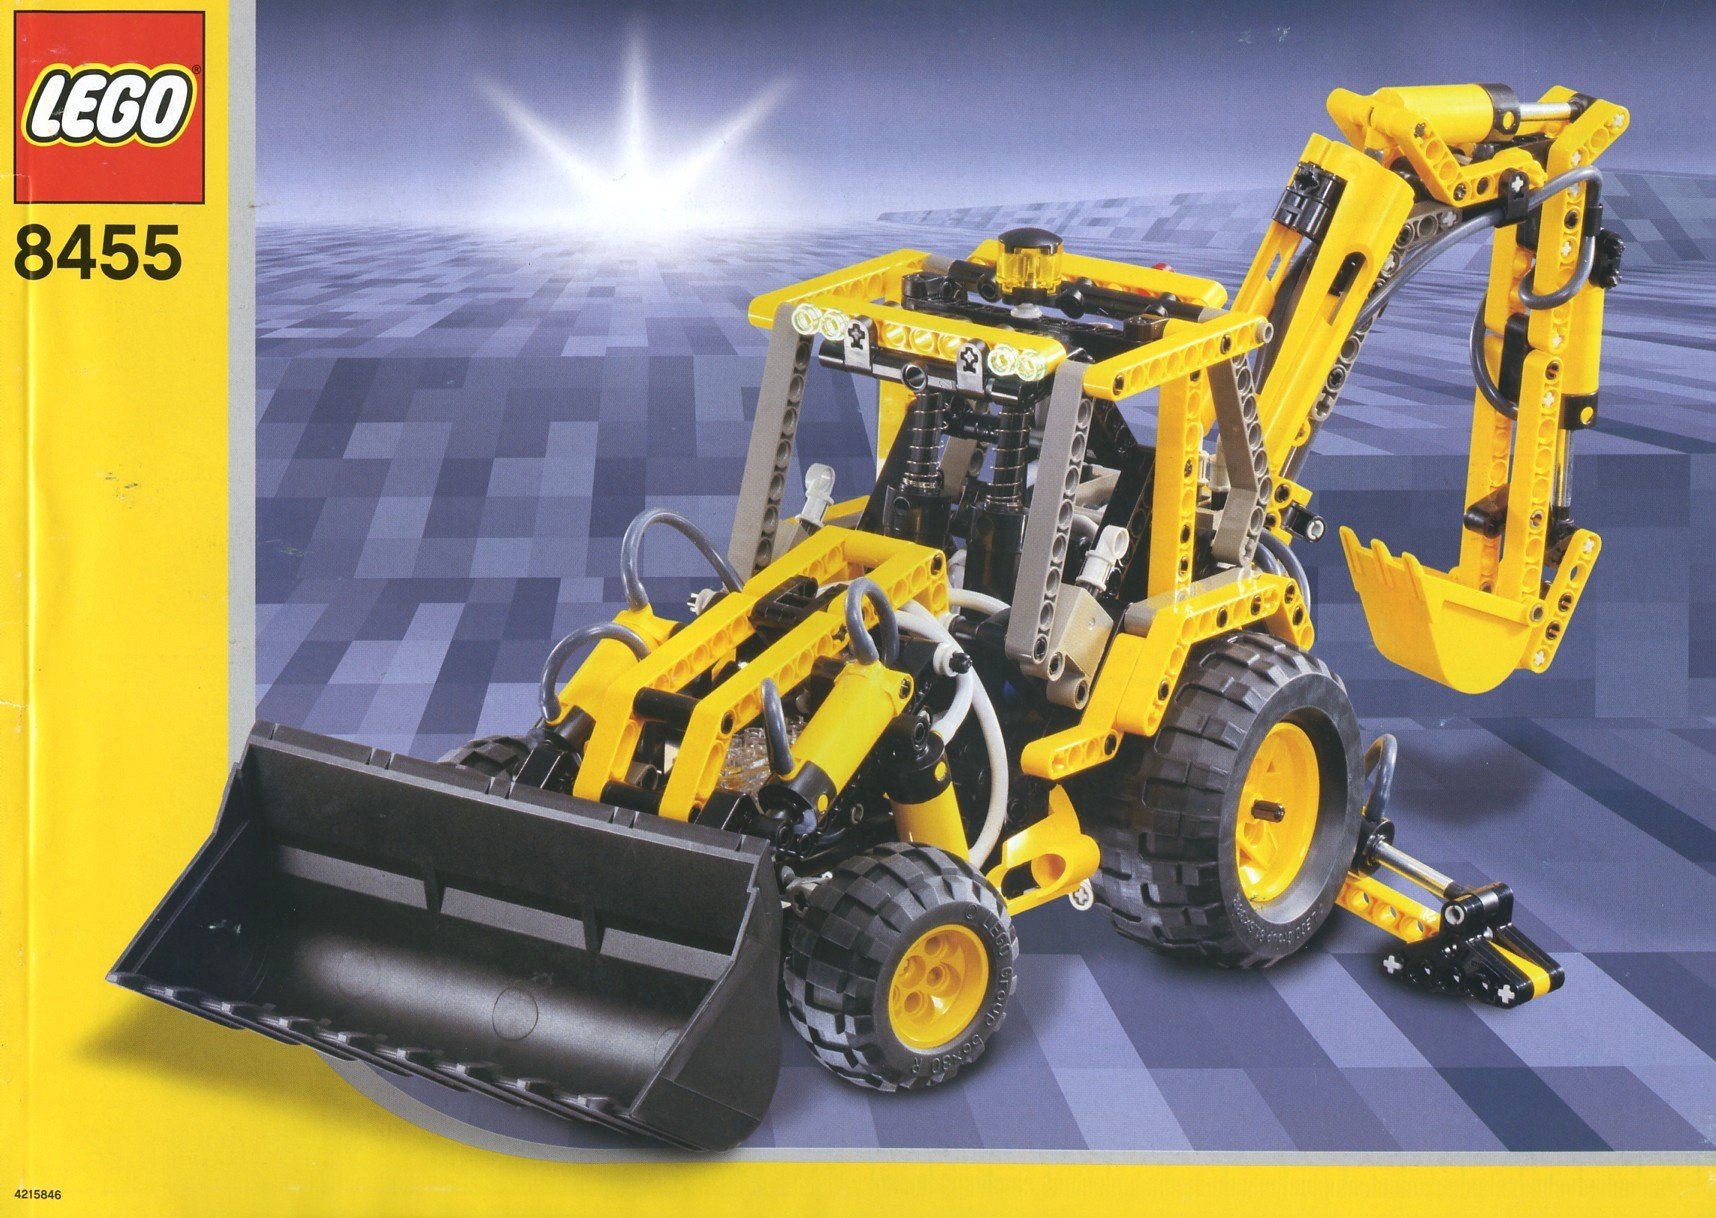
8455 Excavator, full of functions (2003)
The previous pneumatic backhoe loader only had pneumatics in the rear, but this one went all out. The front bucket, backhoe and outriggers were all controlled by a whopping 7 switches and 10 cylinders. No set before or since has come close. The only way to improve this set is to add an air tank.
42053 Volvo EW160E, she's got the looks (2016)
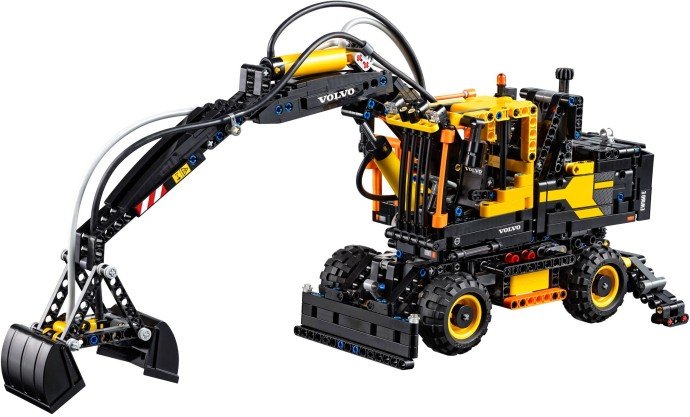
This is a fantastic set and probably my favourite Pneumatic set. It just has it all; packed with features, pneumatic and otherwise, and lots of great parts. It has just enough detail to look great but still looks like a Technic set. Plus you can add a battery pack and motor to give it a built in compressor. And all that in a compact size which meant it was affordable.
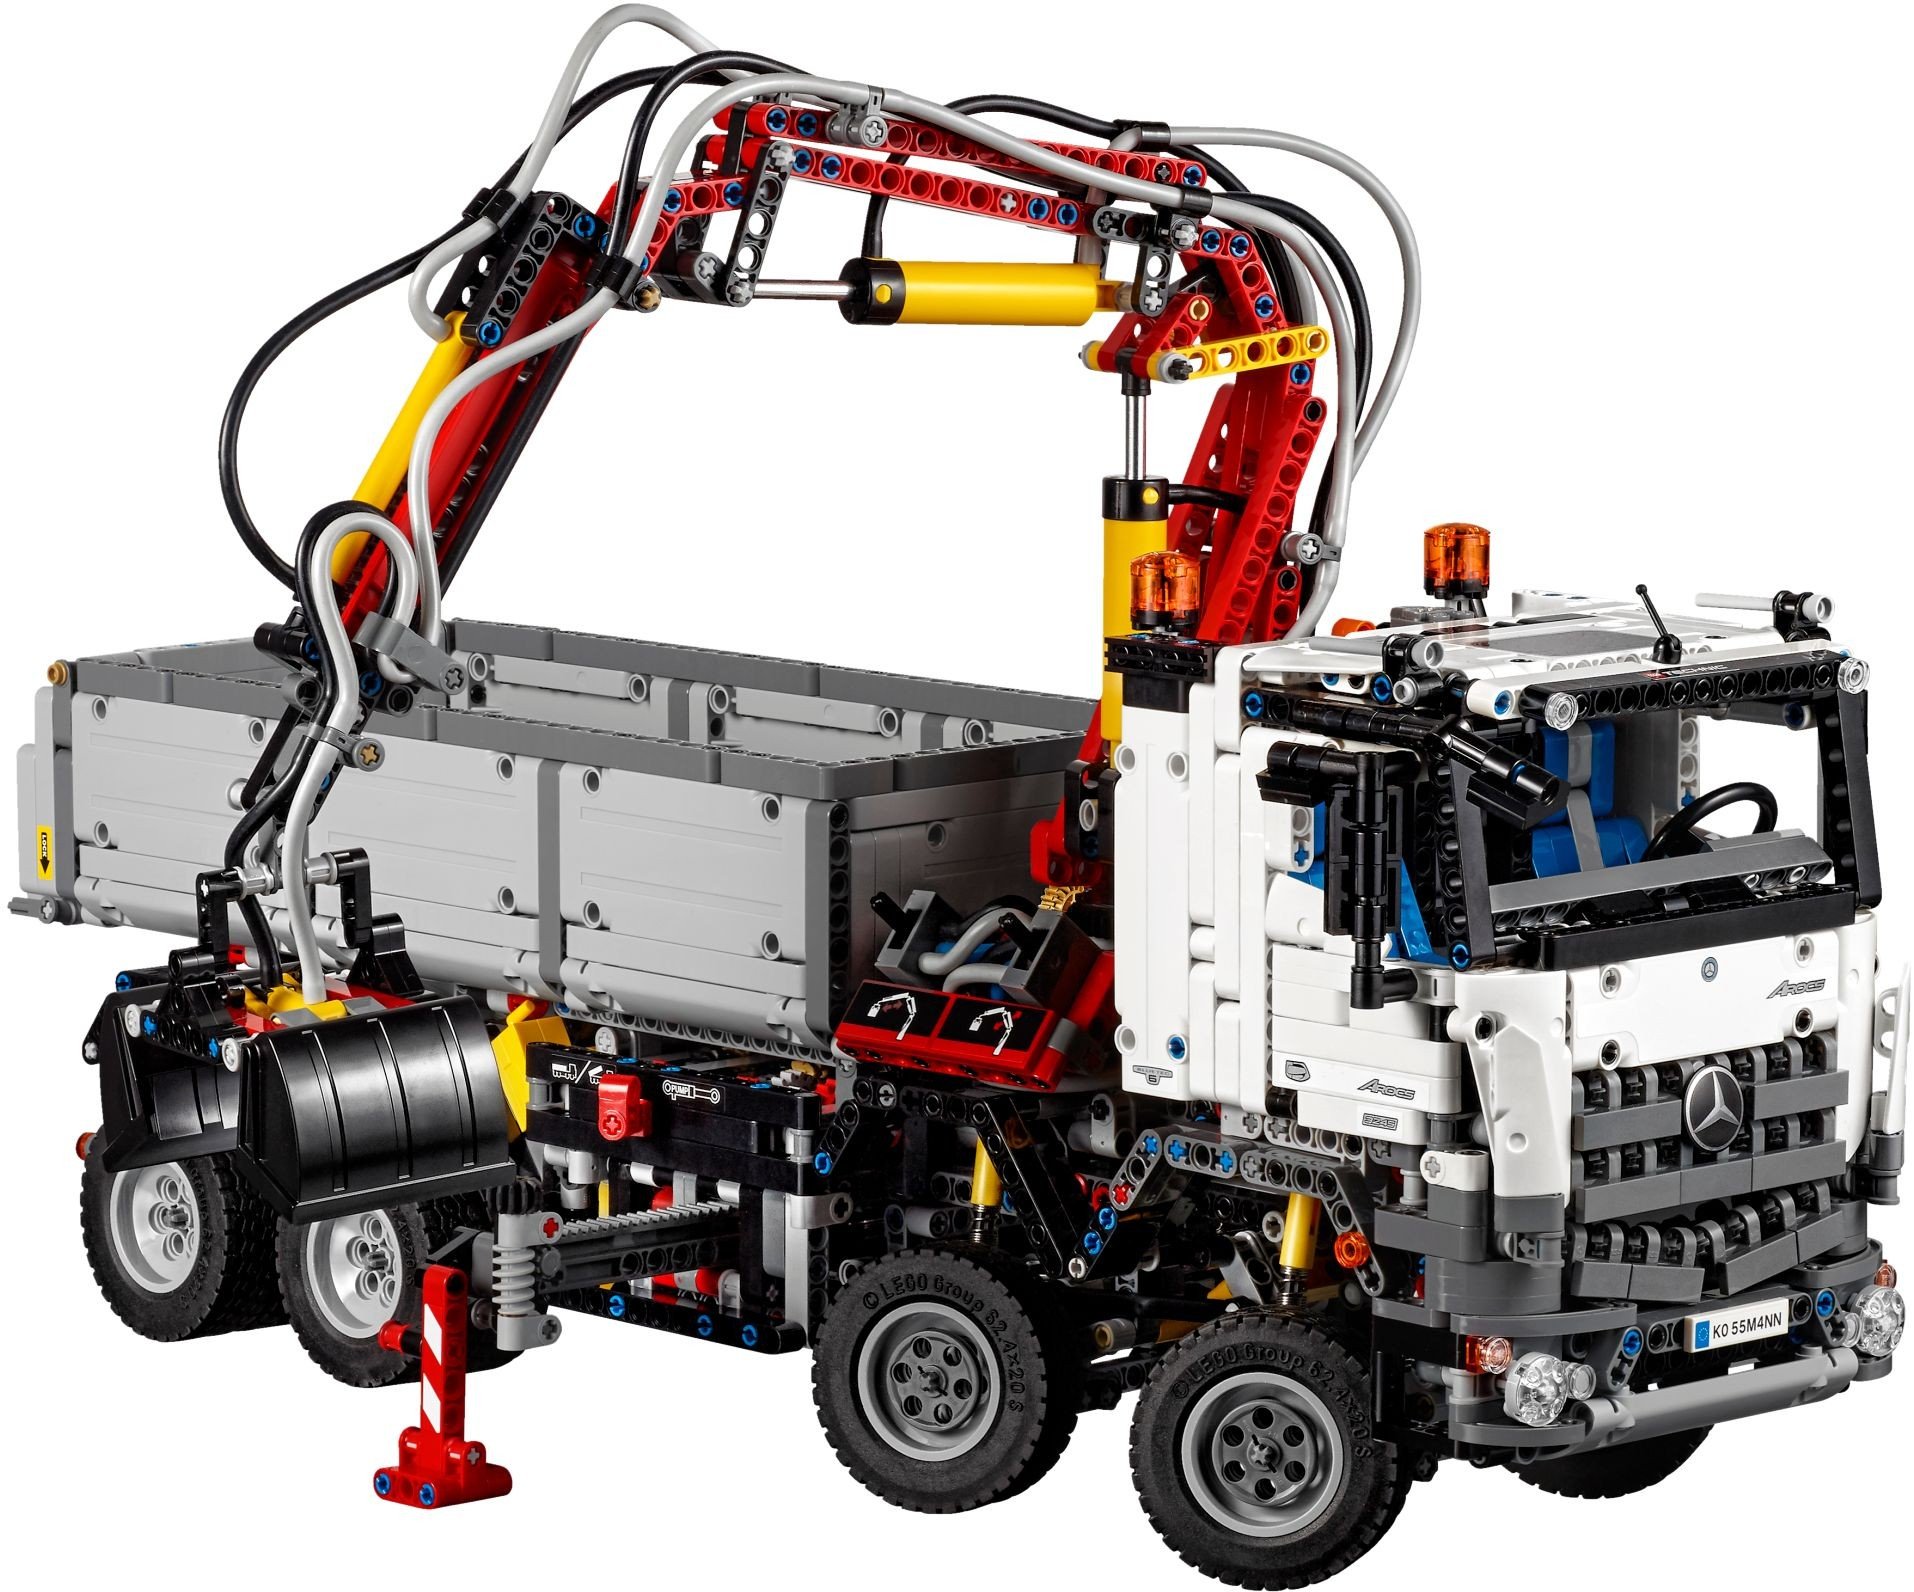
42043 Mercedes-Benz Arocs 3245, the largest (2015)
The largest Technic set when it came out is now only the 8th largest... This set does so much more than just pneumatics. Thanks to a gearbox, the motor that drives the compressor can also extend the outriggers, tilt the loading platform or rotate the crane. It also has full suspension and 4-wheel steering.
Pneumatic Hall of Fame - of Builders (AFOLS)
I also want to highlight a few LEGO builders who have done some amazing things with pneumatics. The first is Jennifer Clark. She was only active as an AFOL (Adult Fan of LEGO) for a few years before her music career started, but in those few years she created some impressive MOCs.
Her first pneumatic MOC was a small skid loader with relatively simple functions. This was followed by a compact excavator, where she managed to cram an insane amount of functionality into a model that literally fits in the palm of your hand. The third and final model was a JCB JS220, where she used all the experience from the smaller excavator to make it even better.
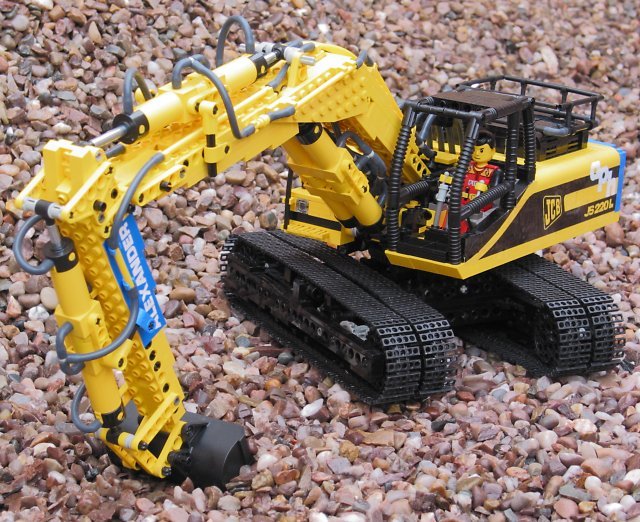
That JCB is a masterpiece of LEGO engineering. It has motors to drive the tracks and swing the superstructure and pneumatics to steer the boom. Not only are the dimensions and range of motion very precise, so is the steering. For that they built a custom remote control that is umbilically connected to the pneumatic compressor on the model. It has joysticks that operate the same functions as in a real JCB excavator. I had the pleasure of playing with this excavator at a Scale Model event where we were both exhibiting.
Also check out her website, which not only shows the models but also describes the technical principles and development journey behind them.
The second builder is fellow countryman Rene Kok. When he realized that the pneumatic cylinders of LEGO work exactly the same as those in a steam engine, he created a number of American gear-driven steam locomotives. I am not sure, but he may have been the first to do so. My favorite is his model of a Shay:
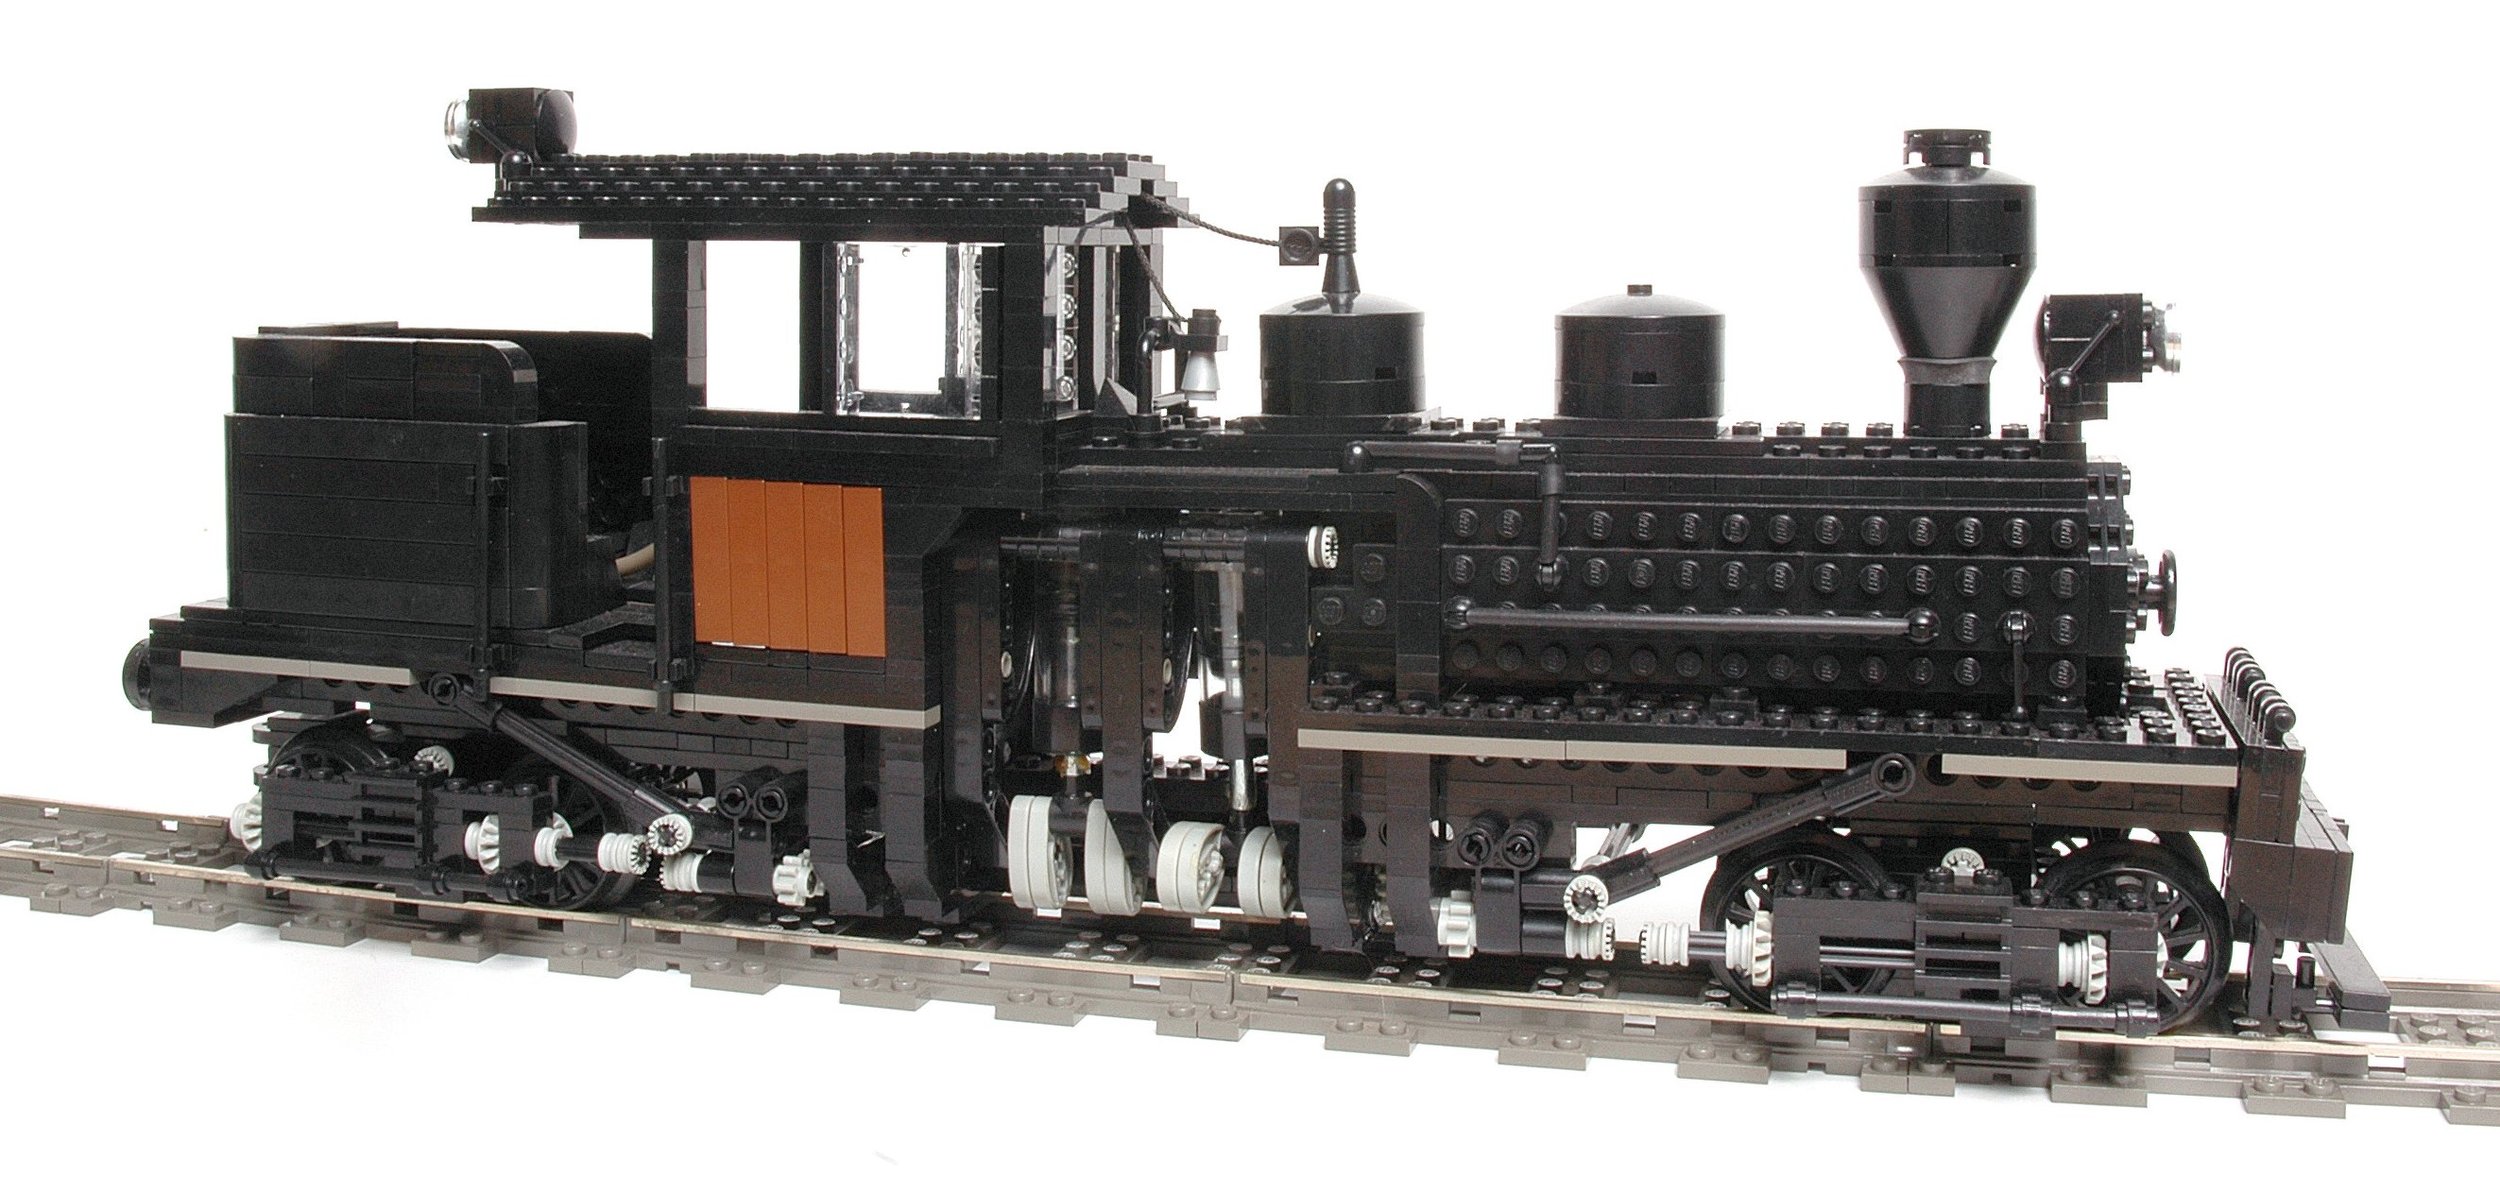
The usual bright yellow pneumatic cylinders would have been out of place here, so Rene used the transparent ones from LEGO Education sets. I have seen this locomotive running on rails, connected by an umbilical tube to a compressor, and it is a beautiful sight and sound. Check out his other models in his Brickshelf folder.
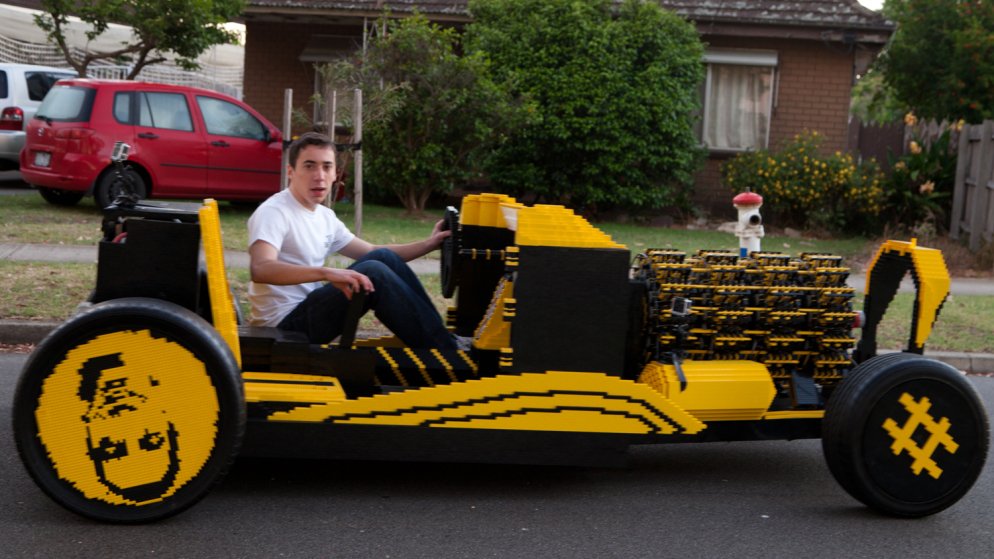
The next builder has taken pneumatic engines to the next level. Alex "NicJasno" Zorko is Mr. Pneumatic Engine. He modeled internal combustion engines instead of steam engines and has spent a lot of time perfecting LEGO pneumatic engines. His videos are not for the faint of heart; he uses drills to enlarge the ports on the cylinders for better airflow and uses lubrication for better performance, but the results are incredible. He has had his V8 rev over 1500 rpm.
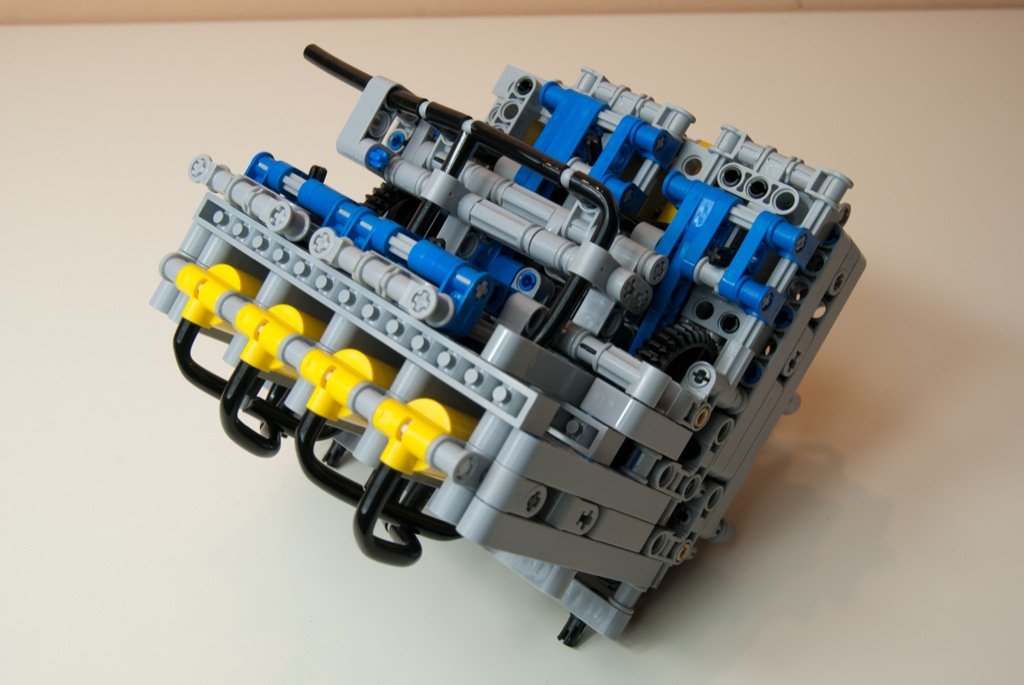
LEGO pneumatic motors are very powerful and Alex uses that power for big Technic cars. Those models are not only impressive because of their motors, but the steering and suspension are also incredibly well designed. Check out his YouTube channel for some impressive videos!
The last builder is someone I know very little about, but he built the most insane LEGO pneumatic motor MOC ever. Did I mention pneumatic motors are powerful?
The Return of Air Power

The release of the John Deere set means that this is the first time since 2006 that we have had a pneumatic set in three consecutive years. It seems that pneumatic sets are more popular than ever! Also, next year is the 40th anniversary of LEGO Pneumatics. Will LEGO mark this milestone with a special set? Perhaps a new studless air tank? Perhaps a pneumatic motor set? Only time will tell...
Here are a few more technical notes. For this article I used the Rebrickable inventories and part numbers. In some cases they differ from BrickLink and Brickset part numbers. For example 47223a on Rebrickable is 4694bc01 on BrickLink and 33163 on Brickset.
Lastly, if you want to get started with pneumatic motors, check out this video on the Brick Technology YouTube channel. Who knows what you can achieve with air motors now!


